MadArtBot: Birth of a 3-D Printer – Part 2

 Well, it seems I was way off base when I said Ben Franklin invented Linux. He only advocated for the adoption by the founding fathers user group. Madison actually wrote the code. At any rate, welcome back for part two of our 3-D printer odyssey. If you’re just joining us and don’t know what I’m going on about, check out Part 1.
This time around we’re going to have a look at what goes into building a MakerBot Thing-o-Matic and start putting it together. But first, maybe you’d like a quick primer on exactly what makes this thing a ‘printer’ and what makes what it prints ‘3-D’. All very valid questions. You’re very smart. And if you read Steve’s RepRap post and then pretended like you already knew… then that’s cheating. Cheater.
A 3-D printer is a 3-axis machine which moves some sort of build platform around in 3-D space all the while building up an object using some sort of pliable material. In almost every 3-D printer you’ll see, this material is heated, extruded ABS plastic or something very similar to plastic such as PLA, which I like to refer to as “plaaaahhh”. The thin extruded (hot!) stream of plastic is controlled by the printer and the build platform (or in some cases the print head itself, also called the ‘hot end’) moves up/down, left/right, backwards/forwards so that a cross-section of the final object is built over time until… voila! A plastic hinge to replace the one on the toilet before your significant other comes home and finds you’ve broken the toilet. Again.
 The image on the left links to a great exploded view of the Makerbot Thing-o-Matic 3-D printer at the NY Times. The only difference being that ours has a new Mk7 extruder that’s smaller than the Mk6 shown. Our printer also has an automated build platform, but we won’t be using that at first (for reasons you’ll see later). You’ll notice in the exploded view that the printer is made up of laser-cut wooden sections. Sections someone has to put together. That someone would be me…
Let’s go!
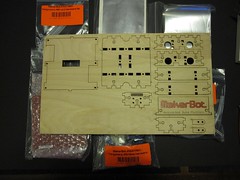
 Here’s a look at the flat-packed parts. Each has been laser cut and is very very precise. Once pulled from their blanks, I’ll be using a method called ‘T-slot construction’ to put it together. This method uses a nut set sideways within a slot in the wood part which joins a perpendicular section using a bolt (OK, they say screw… but it’s a bolt, dammit.) Once enough such joints are made, the end product can be very rigid and strong.
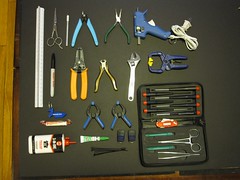
 Building the base structure takes a while. I split this part over a couple of days. Step one, get your tools together. Need tools and don’t know where to go? Try Adafruit and/or MakerShed for good basic small tools to get you started. I didn’t find that the glue gun wasn’t needed, really, but they recommend having one. And yes, that’s a Marker of the Beast.
X axis: This is the business end. The build platform that sits on the Y axis and moves left to right. This particular platform has a conveyor belt that rides over the heated platform (on two rods via those self-leveling bearings). The General Gau’s Chicken is not included with the Makerbot.


Y axis: Moves forward and backwards and also houses the servo for the X axis. It also has self-leveling bearings (and also regular bearings for guides) which ride on two steel rods. Each axis has a cut-off switch at one end so as to aid in calibration (the maximum travel for X, Y and Z is already known, you simply need to set where ‘zero’ is).


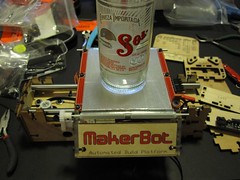
 Now it’s time to marry X and Y in a shotgun wedding featuring Mexican beer. The belt on the X axis is hooked to the servo on the Y axis and the tension is adjusted until it’s snug and not too tight.
z axis: The third axis carries the extruder up and down. The extruder – the hot end the plastic comes out of which we’ll talk about next time – will then be able to address the build platform in 3 dimensions by moving all three axes in concert. This platform has a worm gear that’s fitted to a servo that will sit atop the Makerbot in the rear to raise and lower the Z axis.


Shell: Holy moly, we’ve nearly got a ‘thing’! Look at it. Now it’s a matter of getting the shell constructed while carefully stuffing in the other bits.


Now that we have the basic structure built, you can sort of see how it all fits together. Next up is the platform mechanics and electronics. We’ll look at building the extruder and fitting the electronics next time. Excitement!
Until then, enjoy this video of an earlier model (with the then-brand-new automated build platform) make a whole bunch of things to some geeky game music. Dance if you wanna!
PS – Again I’m told my history of the computer industry vis-a-vis the founding fathers is incorrect. Until someone invents some sort of online super encyclopedia where I can check these facts (Ha! As if!) , I stand by my version.

I’m not sure how I’m going to continue to live without one of these. Not only do I spend a lot of time modifying my stuff so it does what I want it to do, I also own a small bike store. I often find myself muttering “If only I had a widjitmahoozit yay big, by yay big beveled thusly to fit this rack/mudguard/light/basket/squeekyhornstreamerpump….” Hell, I can seen making 3D badges to attach to the bikes I sell instead of the lame “Sold and serviced by…..” frame stickers I currently use.
Oh, and I should mention that I can’t wait to see what you folk do with it. I’m sure it’s going to make my dreams of this thing look pretty prosaic.
Amazing, really.