This article originally ran on my (now semi-defunct) aquarium blog, but it’s good information if you want to try setting up a fish tank. I’d also like to write some follow up pieces on teaching kids a little bit about biochemistry by way of aquaria.
So You Want to Start an Aquarium?
Great! While the focus of this blog is mostly about trying to encourage people to try out marine aquaria, many people feel a lot more comfortable starting with fresh water systems. That’s fine! Fresh water (let’s abbreviate that to FW, OK?) tanks have a lot of benefits, in that we can eliminate the need for a lot of equipment, but let me stress one thing. FW isn’t easier than saltwater, or vice versa. It has different considerations, but almost all the principles involved are the same. The major reason I think people have the perception that FW is easy and SW is not, is the cost of the livestock. It’s certainly more palatable to most people to get all of their silly beginner mistakes out of the way with fish that cost $1.95, rather than, say $99.00.
What You Need
Let’s start with a rundown of all of the equipment needed to start a FW aquarium.
- Glass or Acrylic aquarium
- Top/Hood/Lid
- Stand
- Heater (if tropical)
- Thermometer
- Light
- Filter
- Gravel/Sand
- Decoration/Plants
- Fish/Livestock
- Fish food
- Dip net
- Gravel Vacuum
- Dechlorinator
- Bucket
Size Matters
The first item on the list is the tank itself. Since we’re talking about beginner tanks here, I want to address something that comes up a lot early on. Something a tad counterintuitive. Many people assume that a small aquarium is an easier aquarium, but in reality, the exact opposite is true. Think of it this way: a larger pot of water takes longer to boil, right? Therefore, anything that goes wrong in your tank, mechanically, chemically, whatever, is going to take longer to happen in more water, and you’ll have more time to catch it and fix it. So the best advice I (and most others) have regarding tanks is always bigger is better.
OK, you say, but what if I can’t afford a big tank or don’t have the space? Small tanks aren’t impossible, they’re just more challenging. My very first aquarium was constructed not knowing any of this. It was a 10 gallon nanoreef tank, and I did OK. Had to learn about testing my water a lot though!
Another word of advice I have about buying tanks is that they’re almost always sold at (or very very close to) cost. Retailers don’t make money on them, they make money on all the other stuff. So you’re unlikely to find too many bargains on brand new tanks in stores, although one big box pet retailer does occasionally run a “dollar per gallon” sale where they actively lose money on tanks with the hope that you’ll buy all that other good stuff to make up for it. Another great way to find aquariums for cheap is to look for people trying to get rid of them. I’ve bought tanks at garage sales plenty of times, and as long as you’re cool with taking the risk on a possible leaker (it happens, but it’s usually worth the risk to pick up a tank for a few bucks) this can be a great way to acquire a tank. Similarly websites like craigslist are often good places to find cheap or free tanks people are trying to offload.
Hoods and Lights
Ok, we have a tank. Now we need something to keep the fish in it and the cat out of it. The two most common options in most cases are either a plastic hood (usually with a fluorescent strip light included) or a glass top (light will need to be acquired separately). Here’s where we may need to ask ourselves a question about what kind of aquarium this is going to be. If we’re planning on a few small fish and some plastic plants or other decorations, then the plastic hood is fine. (You can use some of the same bargain hunting techniques mentioned above to find a hood, or sometimes eBay is good for piecemeal stuff like that). A glass hood is most useful for letting the maximum amount of light into the tank. So if you have designs on a planted tank with live plants (definitely recommended, it’s awesome!) then a glass lid is the way to go. Glass lids are generally about $20 US for smaller (say 20 gallon tanks) and go about a dollar per gallon in size as you go, with oddball sizes like hexagonal tank lids being more costly. Glass lids have another maintenance-related perk in that they’re generally better at preventing evaporation, so you’ll have to worry about that less.
Lights themselves probably deserve a whole article of their own at some point. Luckily, with FW tanks, fish don’t particularly seem to care much about the quality of the light. If you are planning on a planted tank, you may want to make some adjustments. The only thing I’ll add here for now is that while fluorescent fixtures and bulbs are cheap to buy upfront, newer LEDs are much cheaper to run in the long run. So consider that when you’re picking them out. My FW tank uses LEDs and I’m really happy with them.
Stand By Me
OK, the stand. Stands are something you generally won’t find great deals on online. They’re heavy and expensive to ship. We’ll cover types of stands and maybe some tutorials for making stands at a later time. Some people do opt to make their own. If you buy one, avoid ones that are entirely made of cheap pressboard. Angle iron stands are inexpensive but also have some of their own issues. Once you have a stand, make sure it’s level and in a place that’s not receiving too much direct sunlight or temperature swings.
Filtration
The last major piece of equipment you’ll need is a filter. Filtration as a topic will be getting it’s own articles, for sure, but let’s talk about common filter types for FW. First off, there are 3 basic kinds of filtration in all tanks: biological, chemical and mechanical. Most use at least 1 of these methods, some use combinations of all of them. The most common type of filter in the world of FW are hang on the back filters, which use mainly chemical and mechanical filtration.
What does that mean? All tanks use at least some biological filtration. We’ll talk about the Nitrogen cycle later (don’t be scared, it’s really cool), but the short version is that there are billions of beneficial bacteria in the water breaking down waste into less toxic chemicals. This is why we never want to remove ALL of the water in an aquarium. We’d be removing all those bacteria and actually be making things worse. The media (artificial sponges usually) you put into a hang on the back filter acts not only to mechanically catch waste, but as a place for these bacteria to grow and break stuff down. Chemical filtration is the adding of chemicals to the water to help neutralize the effects of ammonia, nitrite or nitrate. Usually this is done by adding activated carbon to the filter.
For small tanks, hang-on-the-back filters (HOB) are fine. If we start going over the 55 gallon mark, they start to be less effective at moving water enough to do their job and aquarists usually start looking at other options. Another handy, off the shelf type of filter are canister filters. These sit under the tank and look like, well, a canister, with two tubes going back into the tank. One tube is an intake to suck water down, where it gets cleaned in the canister chemically, mechanically and biologically, 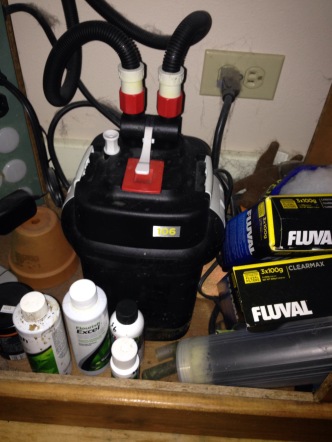 and then is pumped back up through the other tube. Canisters are more expensive than “HOB” filters, but tend to be much more powerful and do not need to be cleaned as often. Sometimes these can be purchased cheaply used. They tend to last a long time, so it’s an option. Make sure to replace the gaskets if you go that route.
Misc Stuff Needed:
There are going to be some odds and ends here. If you plan on keeping tropicals (animals that like the water between 72 and 80º F), you’ll be needing an aquarium heater and a thermometer. When picking out a heater, I really recommend submersible heaters as they tend to be much better made than non-submersibles. Figure about 5 watts per gallon of water. I like to overshoot the mark a little bit and turn mine down to be safe. You’ll need a thermometer as well to make sure you’re not chilling or cooking your critters. Always have a thermometer. You can go old school and put a $2 one in, or you can go digital and get more accuracy. I like the old style because they work even when the power’s out, and the price is right.
You’ll also need to put stuff in the tank. We’ll cover “aquascaping” another time, but sand, gravel or river rocks are all good options for bottom substrate. I use hardware store “play sand” in all of my tanks because it’s about $3.00 US for a 20 lb bag of it. How you decorate the tank is up to you, but I strongly urge you to research the biome of the animals you’re going to be keeping and try your best to emulate that.
Cleanup
When it comes time to do water changes and cleaning, you’re going to want what’s called a gravel vacuum or aquarium siphon. Also, a bucket. You can get buckets cheaply a lot of places. Hardware stores certainly, but also I just found some for $1 a piece at my local sandwich shop (used for pickles), so look around! The siphon cleaner is basically a hard plastic tube for stirring up the gravel attached to a flexible hose. When I was a kid learning how to do this, you would put the hard tube in the tank, run the flexible tube down into your bucket, suck at the bucket end and hope you didn’t get a mouthful of horrifying water. Nowadays, you can get them with a little hand-pump built in that eliminates all the fun but will probably save you from that fate. You can also make your own out of some flexible and rigid tubing. You’ll also probably need a bottle of dechlorination chemicals you can buy at just about any pet store. Most fish are really sensitive to the chemicals that are put into our tap water to make it potable, so this is a must. It used to be that you could let tap water sit for 24 hours and that was enough to neutralize chlorine, and it is, if chlorine was the only thing in the water, but most places also use chloramine, which is a much more tenacious beast and must be treated out. Obviously you’ll also need a good quality fish food of some kind and fish. Don’t stock your entire fish tank immediately though. We need to “cycle” the tank (another future article!), so pick a single fish, or even better wait for a week or two before even putting anything in!
Lastly, you’ll need a dip net for working with fish, removing unwanted stuff, etc. These are usually very cheap. Like a $1.00 US or so, but like almost all these odds and ends, your mileage may vary. Also, one great source for these things can be asking your local fish store (that’s LFS in fish geek parlance), if they have a “used equipment section.” You’d be surprised how often they do. I’ve gotten tanks, lights, decorations and other stuff just by asking around for that and offering to pay cash for it. I also check eBay frequently for stuff like heaters and such. They are often available straight from the factory in China for next to nothing.
Wrap Up
I hope that helps give you folks a good jumping off point for starting an aquarium on a budget. If you have any questions, please drop me a comment below or tweet me @Blackmudpuppy.